Macarons. Revealed!
Helloooooooooooooooooooooooooooooooooooo!!!
Happy New Year Everyone!
P
What a great year! I went in this year with a big big smile on my face and thankful for everything! Hopefully this happiness will continue and prosper throughout the whole year!
I'm so energized and ready! I can really feel it, this year will be my year!
So what better way to start up my blog? Well of course my favorite and obsession yet the one I fear the most, French Macarons!!!
There are sooooo many myths to this small and too sweet for my taste cookie.
The only myths I believe in is using room temperature egg whites (not aged) and thats it!!
My recipe doesnt even call for airconditioning rooms or cream of tartar! and I will tell you why later on,,
I just love looking at these cookies but I dont eat them a lot. unless its a chocolate or caramel macaron then by all means.
This recipe is adjusted to what I think is best for Philippine Weather. If you're working in a cooler climate just follow every standard procedure there is for baking these macarons.
Thanks a lot to Nikki Misa aka my Macaron Queen for her helpful tips! Later on, i'll share more about her helpful tips but her recipe can only be tasted at the Fairmont Suites And Raffles Residences Makati City! So please visit Cafe Macaron! :)
ok if you are slightly on the impatient baker as I am, you will like this recipe! Plus! if you dont have a convection oven this works also!
 Please forgive me I dont have a picture of the outcome of what I did for this blog but I will show you some I made! they hardly vary on what they look it just depends on how you pipe them!
So this Philippine-Proof recipe calls for:
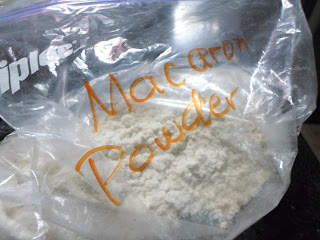
150g Almond Flour I call it "Macaron Powder" (equal parts of pulverized almonds and powdered sugar)
73g Egg whites
140g Powdered Sugar
its always best to make your own macaron powder. just take 75g of almonds and 75g of powdered sugar, blitz and pulse in a food processor til completely pulverized. Sift and whatever doesnt go through the sift pulse again. once everything passes through your sieve, sift everything together one last time. you can do this the day before. place it in a cool dry place in a tight container or as I do a ziplock!
food color of choice.
this makes 20-22 standard size macarons, that means around 40-44 macaron shells.


You'll be needing:
-Piping Bag
-no. 8 tip (or just cut the piping bag around half an inch.)
-An oven (this is a must! hahaha!!( if youre not using a convection oven, you just put the temp down minus 20deg. so this recipe needs to baked at 325deg F, you just put it on 305deg F)
-Parchment Paper (i love the cook n bake parchment paper from glad! DONT USE A SILPAT FOR THIS IT DOESNT WORK TRUST ME I TRIED! hahaha)
-baking pans.
Procedure:

in a mixing bowl, add the powdered sugar and egg whites together. You could add cream of tartar if you wish or an egg stabilizer (as one of Nikki's tips) but I just dont opt to and it works for me! cream of tartar stabilizes your egg whites meaning it makes it more elastic the more you whip it up. but i have utmost faith in my powdered sugar, as sugar also helps you make your egg whites more elastic.
 I also like to add the food coloring now. before I whip it up but you could always put it at the end or while folding if you like different colors in one batch. Your call!
Whip those egg whites to stiff peak!


When you see this. Youre not even half way! keep on whipping! (in dory's voice) just keep whipping, just keep whipping!

 This is what youre looking for. you can see like pulled caramel-like ribbons at the sides of the bowl! Thats perfect youre ready to fold in the macaron powder!
Now one more way to find out if youre ready to fold the macaron powder is:
 On the whip attachment the egg mixture stands up like alfalfa's hair! :)


Folding the macaron powder in two parts it will first look like the pic above like it has no chance in mixing together, dont be afraid! thats normal! just put some muscle into it and keep on folding!
 you'll eventually get to this stage but youre kinda looking for a "lava like" consistency when you scoop some with the spatula and you let it fall the movement of the batter is like lava, flowing but slowly flowing...

once it looks like this, we are ready!
Place in your piping bag and pipe out small coins about a quarter inch in diameter.
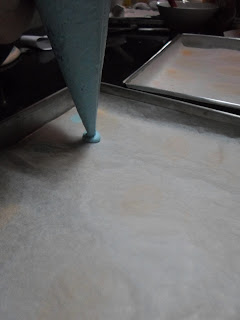

Not the best piper in the world but decent enough! I'm not using a tip to show you guys what it could possibly look like..
Now give them a gentle tap to get the air bubbles out and it should look like this:

The drying Part: if your kitchen is not air conditioned and no way great and all humid like a typical home kitchen, then when making Macarons, I suggest you invest in one of these:
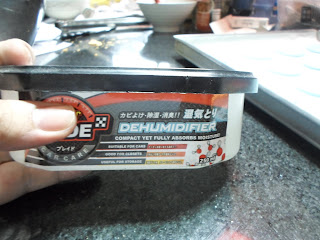
Usually used for cars or closets but today I'm using one for my macarons to dry properly! and it is super effective!
it depends on how humid your place is but on a sunny day you could get this dry to be safe for 40 mins to an hour. Maximum hours is 2! you will instantly see the "shield" when you touch it it isnt sticky.

and notice the change in color thats how you'll know its ready to bake!
Bake for 12-14 Minutes once you see feet and try to wobble the cookie it doesnt, then they are done! they shouldnt turn brown! those are already burnt and dry.
 kinda looks like these. notice the middle only rised on the other side, just because my oven sucks cause it sooo old. i have hot spots already in my oven.
but its okay! nobodys perfect!

Now just put any filling you choose. can be buttercream, jams or ganache then enjoy!


So hope you guys find success in this recipe as I did! Believe me i went through all of it! it was a whole year obsession to find the perfect recipe that works for me.
This recipe i formulated was semi-adapted from Heny Sison and Nikki Misa.
To a great new year!
xxx
Happy New Year Everyone!
P
What a great year! I went in this year with a big big smile on my face and thankful for everything! Hopefully this happiness will continue and prosper throughout the whole year!
I'm so energized and ready! I can really feel it, this year will be my year!
So what better way to start up my blog? Well of course my favorite and obsession yet the one I fear the most, French Macarons!!!
The only myths I believe in is using room temperature egg whites (not aged) and thats it!!
My recipe doesnt even call for airconditioning rooms or cream of tartar! and I will tell you why later on,,
I just love looking at these cookies but I dont eat them a lot. unless its a chocolate or caramel macaron then by all means.
This recipe is adjusted to what I think is best for Philippine Weather. If you're working in a cooler climate just follow every standard procedure there is for baking these macarons.
Thanks a lot to Nikki Misa aka my Macaron Queen for her helpful tips! Later on, i'll share more about her helpful tips but her recipe can only be tasted at the Fairmont Suites And Raffles Residences Makati City! So please visit Cafe Macaron! :)
ok if you are slightly on the impatient baker as I am, you will like this recipe! Plus! if you dont have a convection oven this works also!

So this Philippine-Proof recipe calls for:
150g Almond Flour I call it "Macaron Powder" (equal parts of pulverized almonds and powdered sugar)
73g Egg whites
140g Powdered Sugar
its always best to make your own macaron powder. just take 75g of almonds and 75g of powdered sugar, blitz and pulse in a food processor til completely pulverized. Sift and whatever doesnt go through the sift pulse again. once everything passes through your sieve, sift everything together one last time. you can do this the day before. place it in a cool dry place in a tight container or as I do a ziplock!
food color of choice.
this makes 20-22 standard size macarons, that means around 40-44 macaron shells.


You'll be needing:
-Piping Bag
-no. 8 tip (or just cut the piping bag around half an inch.)
-An oven (this is a must! hahaha!!( if youre not using a convection oven, you just put the temp down minus 20deg. so this recipe needs to baked at 325deg F, you just put it on 305deg F)
-Parchment Paper (i love the cook n bake parchment paper from glad! DONT USE A SILPAT FOR THIS IT DOESNT WORK TRUST ME I TRIED! hahaha)
-baking pans.
Procedure:

in a mixing bowl, add the powdered sugar and egg whites together. You could add cream of tartar if you wish or an egg stabilizer (as one of Nikki's tips) but I just dont opt to and it works for me! cream of tartar stabilizes your egg whites meaning it makes it more elastic the more you whip it up. but i have utmost faith in my powdered sugar, as sugar also helps you make your egg whites more elastic.

Whip those egg whites to stiff peak!


When you see this. Youre not even half way! keep on whipping! (in dory's voice) just keep whipping, just keep whipping!


Now one more way to find out if youre ready to fold the macaron powder is:


Folding the macaron powder in two parts it will first look like the pic above like it has no chance in mixing together, dont be afraid! thats normal! just put some muscle into it and keep on folding!


once it looks like this, we are ready!
Place in your piping bag and pipe out small coins about a quarter inch in diameter.


Not the best piper in the world but decent enough! I'm not using a tip to show you guys what it could possibly look like..
Now give them a gentle tap to get the air bubbles out and it should look like this:

The drying Part: if your kitchen is not air conditioned and no way great and all humid like a typical home kitchen, then when making Macarons, I suggest you invest in one of these:

Usually used for cars or closets but today I'm using one for my macarons to dry properly! and it is super effective!
it depends on how humid your place is but on a sunny day you could get this dry to be safe for 40 mins to an hour. Maximum hours is 2! you will instantly see the "shield" when you touch it it isnt sticky.

and notice the change in color thats how you'll know its ready to bake!
Bake for 12-14 Minutes once you see feet and try to wobble the cookie it doesnt, then they are done! they shouldnt turn brown! those are already burnt and dry.

but its okay! nobodys perfect!
 |
| Cute little feet is always nice to see!! |

Now just put any filling you choose. can be buttercream, jams or ganache then enjoy!


So hope you guys find success in this recipe as I did! Believe me i went through all of it! it was a whole year obsession to find the perfect recipe that works for me.
This recipe i formulated was semi-adapted from Heny Sison and Nikki Misa.
To a great new year!
xxx


My last comment didn't show up. Anyway I'm making this. Hopefully soon. :-)
ReplyDeleteFranciene here :-)
ReplyDeleteLet me know if it turns out great! :)
ReplyDelete